
This is the third and final post in our series on welcome email sequences. In the first post, we covered why your welcome email matters more than your newsletter. In the second post, we walked through what a three-email welcome sequence looks like and what to put in each email. If you haven’t read the first two posts yet, start here.
Now we get into the actual build: how to set up your welcome sequence — we’ll use Cyberimpact as an example — so it runs smoothly from day one.
What you need before you start your welcome sequence
Before opening Cyberimpact, it helps to have three things ready:
- Your content. A rough idea at least of what each of your three emails will say — the welcome, the value email, and the soft ask. It doesn’t have to be final copy, but having a direction for each email makes the build faster.
- Your trigger. Know how new contacts are joining your list. Are they signing up through a form on your website? Being added manually to a group? Being imported from another source? The trigger you choose depends on how subscribers enter your list.
- Your timing. Decide on the interval between emails based on your sector and your audience.
Once you have those three things, the setup itself is very straightforward.
Step 1: Create your automation scenario
In Cyberimpact, welcome sequences are built using the marketing automation feature. To start, go to the Automation section and create a new scenario.
You’ll see four ready-made welcome email options:
- Send an email when a new contact subscribes through a form
- Send an email when a contact is added to a group
- Send a series of emails when a new contact subscribes through a form
- Send a series of emails when a contact is added to a group
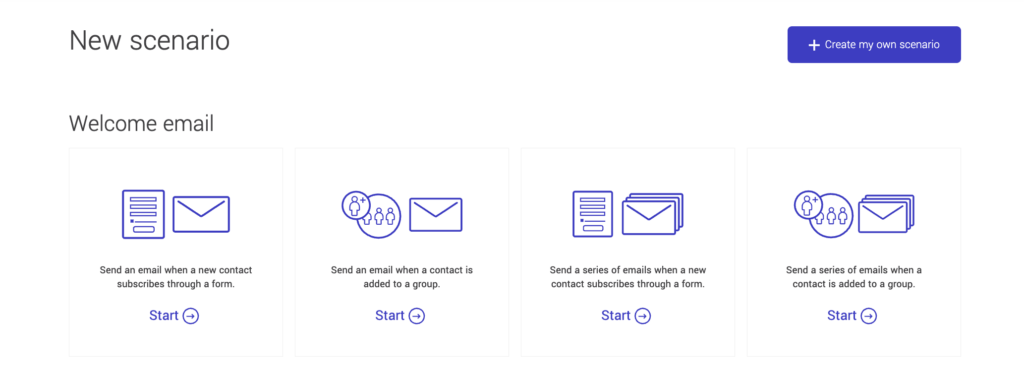
For a three-email welcome sequence, choose one of the “series of emails” options. Which one depends on your trigger: use the form option if subscribers join through a Cyberimpact signup form, or the group option if you’re adding contacts manually or through an integration.
Our tip: If you’re just getting started and want to keep things simple, begin with a single email using the first option (“Send an email when a new contact subscribes through a form”). You can always expand it into a series once the first email is live and working.
Step 2: Set your trigger and timing
Once you’ve chosen your scenario type, you’ll set the trigger condition and the delay between emails.
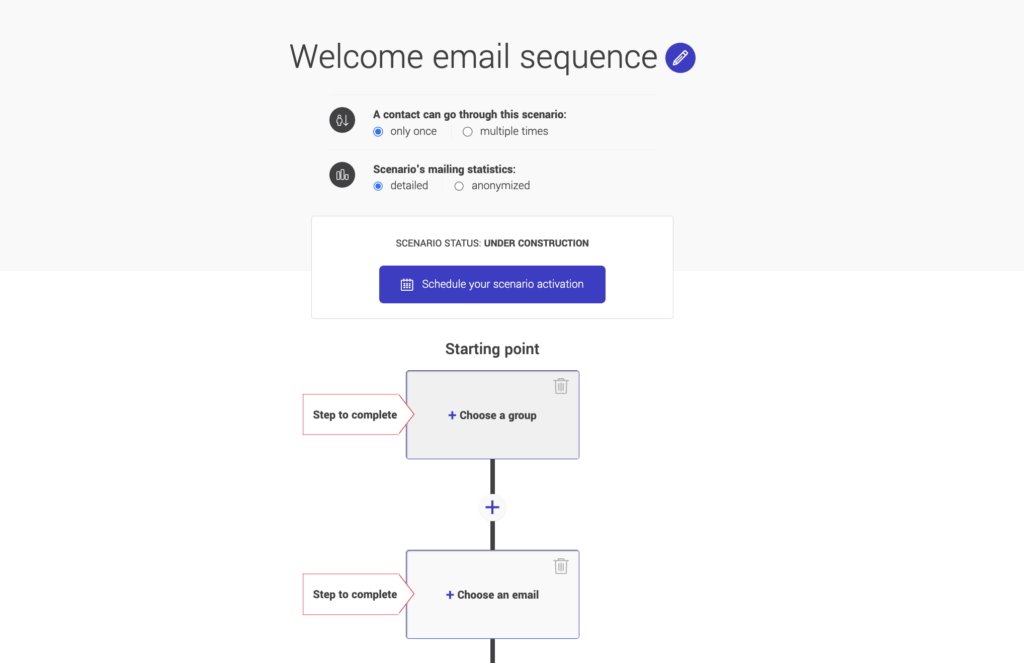
For your first email, the delay should be set to zero so it is sent immediately after someone subscribes. This is the most important timing decision in your entire sequence. The first email needs to arrive while the subscriber still remembers signing up.
For email 2, set the delay between three and five days after email 1. For email 3, set it to five to ten days after email 2. You’re configuring these delays in the automation builder, so Cyberimpact handles the scheduling automatically once a contact enters the sequence.
Step 3: Build each email in the welcome sequence
For each email in the sequence, you’ll create the message directly in Cyberimpact’s email editor. You can start from a blank template or choose from the template library where there are thousands of options, so you don’t need a designer to produce something that looks professional.
You can also use a previous email you sent as your basis — just make sure you save it as a template first.
A few things to keep in mind for each email:
Email 1: The welcome
Keep this one short! Personalize with the subscriber’s first name using the merge tag. Set expectations clearly: what will they receive, and how often, and include one call to action — a micro-survey, a question to reply to so you get that early engagement and it helps with the deliverability of future messages. If you promised something at signup, it’s time to deliver.
Email 2: The value email
This is your chance to prove you’re worth paying attention to. Link to your most useful piece of content, a key resource, or something that directly addresses a problem your audience has. One focus, one link, one clear reason to keep reading your emails.
Email 3: The soft ask
Introduce a next step that connects to what your subscriber already told you they care about. An event, a consultation, a program, a donation — whatever is the natural next action for someone who’s been receiving your content for the past week or two. Frame it around helping, not selling.
Don’t spend too long on design at this stage. A clean, simple email with clear copy outperforms an elaborate one that took three times as long to build. Get the sequence live first, then refine it based on what the data tells you.
Step 4: Use segmentation if you can
If your audience includes different types of subscribers, this is where segmentation can improve your results. In Cyberimpact, you can use the information collected in your signup form or through a micro-survey in email 1 to send a tailored version of email 2 to different groups.
For example: a municipality with both residents and local business owners on the same list might send email 2 linking to resident services for one group and business resources for the other. One question at signup — “Are you a resident or a business owner?” — is enough to make that split.
If that’s more than you want to take on right now, skip it. A single-path sequence that goes out to everyone is still far better than no sequence at all. You can add segmentation later once the core sequence is running.
Step 5: Use your welcome sequence to strengthen consent
Under CASL, express consent is stronger (and better) than implied consent. If your welcome sequence is triggered by a double opt-in form, your new subscribers already have express consent documented so you’re in a good place.
If some of your contacts entered your list through implied consent (a business relationship, a past purchase, or a public interaction), you can use the last email in your welcome sequence to invite them to update their preferences and move toward express opt-in. Add a link to your Update Profile form and a short line explaining why it matters: “To make sure you keep receiving emails from us and only get what’s relevant to you, take a second to confirm your preferences.”
This small step protects your list quality, reduces your spam complaint risk, and keeps your CASL documentation clean.
Step 6: Activate and monitor
Once your emails are built and your timing is set, activate the scenario. Cyberimpact will handle the rest: every new subscriber who meets the trigger condition will automatically enter the sequence.
After the first few weeks, check these metrics for each email in the sequence:
- Open rate: Welcome emails typically outperform regular campaigns. If your open rate on email 1 is lower than your newsletter average, check that the send is triggering immediately and that your subject line is clear and specific.
- Click rate: Look at this if at any point of your sequence you are sending people to a link. However, if you are asking contacts to reply to your message or engage on a micro-survey, look at the number of responses and responses to the survey instead of a click rate.
- Unsubscribe rate: A higher-than-usual unsubscribe rate in the sequence means a mismatch between what subscribers expected and what they received. Go back to email 1 and check whether the expectations you set actually match what you’re sending.
- Completion rate. How many subscribers are making it through all three emails? If there’s a significant drop-off between email 2 and email 3, that’s a signal email 2 needs work.
We suggest you go back and review your sequence one to three months after launch. Check the metrics, re-read each email with fresh eyes, maybe get the opinion of a team member who wasn’t involved in the making process to get a new perspective. With this new information in hand, make one or two targeted adjustments. You don’t need to rebuild the whole thing from scratch. It’s best to make small changes and continue to review the data to learn the impact of each new edit.
You don’t have to build all three emails at once
If three emails feels like too much right now, start with one. Set up email 1 — the immediate welcome — and get it live this week. That’s already a significant step.
Add email 2 when you’re ready. Finally, email 3. The sequence builds over time, and a partial sequence running is always better than a complete one sitting in draft.
The organizations getting the most out of email in Canada aren’t necessarily the ones with the most elaborate setups. They’re the ones that have the basics running consistently and show up for new subscribers at the right moment. A welcome sequence is one of the most reliable ways to do that.
Read the full series on welcome emails
This post is part of a three-part series on welcome email sequences:
- Why Your Welcome Email Matters More Than Your Newsletter: learn why new subscribers are your most engaged audience and what a welcome email needs to do
- How to Build a Welcome Email Sequence (And What to Put in Each Email): learn about the three-email structure, what each email should accomplish, and common mistakes to avoid
- How to Set Up a Welcome Email Sequence in Cyberimpact (Step by Step): learn how build your first welcome sequence, from trigger to metrics
FAQ on building a welcome email sequence
How do I set up a welcome email in Cyberimpact?
Go to the Automation section in Cyberimpact and create a new scenario. Choose one of the four welcome email options based on how new contacts join your list — either through a form or by being added to a group. For a three-email sequence, select one of the “series” options. From there, you set the trigger, the delay between each email, and build each message in the email editor.
What trigger should I use for my welcome sequence in Cyberimpact?
If your subscribers sign up through a Cyberimpact form on your website, use the “when a new contact subscribes through a form” trigger. If you add contacts manually or through an integration, use the “when a contact is added to a group” trigger. Both options support single emails and full series.
How do I personalize a welcome email in Cyberimpact?
Use merge tags in the email editor to pull in subscriber information automatically. The most common one is the first name merge tag, which inserts the subscriber’s name directly into the subject line or body of the email. Personalized subject lines consistently improve open rates.
What metrics should I track for my welcome sequence?
Track open rate, click rate, unsubscribe rate, and completion rate for each email in the sequence. Welcome emails typically outperform regular campaigns, so if any email in your sequence is underperforming your newsletter average, that’s a signal worth investigating. Review your sequence one month after launch and adjust based on what you find.
Can I add segmentation to my welcome sequence in Cyberimpact?
Yes. You can use information collected in your signup form or through a micro-survey in email 1 to send different versions of later emails to different groups. This is useful if your audience includes clearly distinct segments — residents and businesses, members and non-members, donors and volunteers. It requires some additional setup but can meaningfully improve relevance and reduce unsubscribes.
How does a welcome sequence help with CASL compliance?
If your sequence is triggered by a double opt-in form, express consent is already documented. For contacts with only implied consent, the last email in the sequence is a good place to invite them to confirm their preferences and move toward express opt-in via an Update Profile form. This protects your list quality and keeps your consent records clean.
Do I need to be on a specific Cyberimpact plan to use automation?
Yes. Marketing automation, including welcome sequences, is available on Cyberimpact’s Plus and Pro plans. If you’re on the Free or Basic plan, you can still send a single triggered welcome email, but a full multi-email sequence requires upgrading. It’s one of the most practical reasons to consider moving up to Plus.