
You built a website on WordPress and now you’d like to add a Cyberimpact subscription form? Try one of these four easy solutions and grow your contact list.
- Generate a link to a hosted form
- Add an iframe form to a page on your site
- Embed an html form in the footer or sidebar
- Display a subscription form popup
In the following examples, we use different types of subscription forms that you can create with Cyberimpact. If you need help creating your own, consult our frequently asked questions.
Do you need more options?
We chose to keep the examples in this tutorial really simple. However, note that you could use the iframe or html forms interchangeably in most of these examples. The big difference between these two types is that with the html form, you might have to play around with the code a bit more (but they can also be more flexible).
Option 1: Generate a link to a hosted form
Generating a link to a form hosted by Cyberimpact is the easiest way to add a subscription form to your WordPress site. These forms live on their own page, on Cyberimpact’s servers, and are easy to create and use. With our editor, you can customize them to match your website design. Below are a few examples of forms created this way:

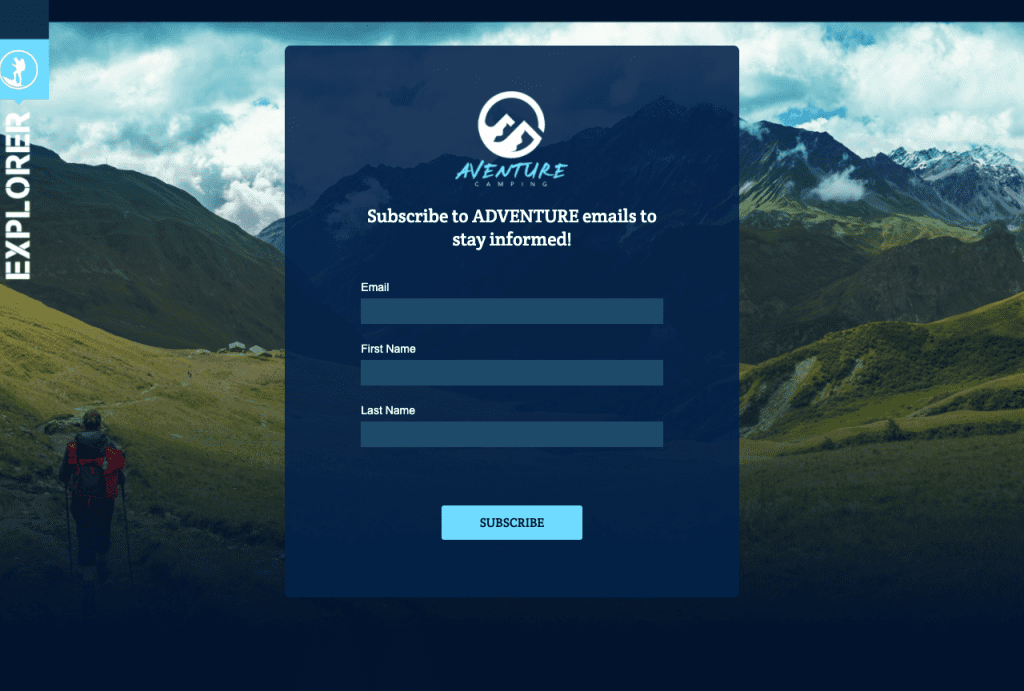

In this example, we’ll add a button to a page that will link to your form.
In Cyberimpact:
- Create a hosted form and customize it to your liking.
- Copy the code so you can add it to your site later.
In WordPress:
- Log in to your website’s back-end (the administration area) and open the desired page in edit mode.
- Add a button block to the desired location.
- Click the link icon and paste the link generated by Cyberimpact in the field.
Helpful tip:
It’s best practice to have the link open a new tab. This way, the visitor can continue to browse your site when they close the window after signing up.
Option 2: Add an iframe form to a page on your site
An iframe is a short line of html code that you can add to your site. The content appears where you place the code.
You can easily create iframe forms with our editor. One of the advantages of using this method: if you need to update your form, you can do so directly in the Cyberimpact editor without having to do anything to your site.
In this example, we will create a page on WordPress and then add an iframe form to it.
In Cyberimpact:
- Create an iframe form and customize it to your liking.
- Copy the code so you can add it to your site later.
About the dimensions:
In the Cyberimpact editor, you can change the width and height of the iframe to adjust the form preview. You will be able to modify these dimensions when you integrate it on your site.
In WordPress:
- Log in to your website’s back-end (the administration area) and open the desired page in edit mode. Let’s call it Newsletter, for example.
- Insert an HTML block in the desired location.
- Paste the code of your iframe form in the HTML block.
Adjust the dimensions:
The width and height attributes allow you to modify the space the iframe will occupy. You can even specify width=”100%” to make sure that the iframe takes all the available width (bonus: if you do it this way, your form will automatically be optimized for mobile). Note that the height must be in pixels. It’s always a good idea to leave a bit of extra space when it comes to the height to prevent scrollbars from appearing.
Add the page to your menu:
- In the administrative tool, go to Appearance > Menus.
- Select the correct menu from the drop-down list at the top of the page.
- On the left, under Pages, select the page you created and click Add to menu.
- Save the menu.
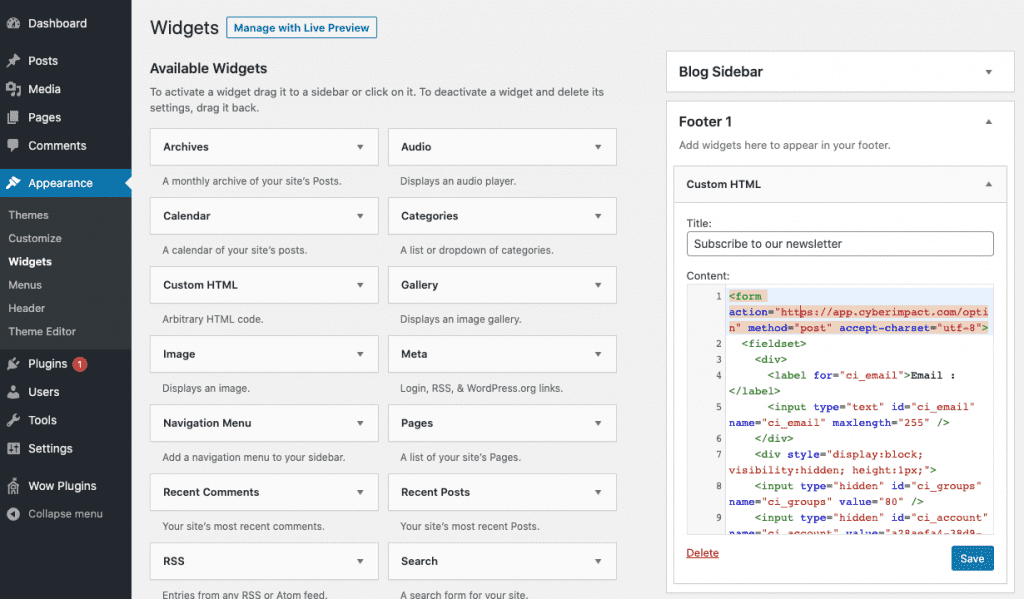
Option 3: Embed an html form in the footer or sidebar
If you are comfortable using HTML code, these forms give you more flexibility.
In this example, we will create a horizontal form in a “widget” area of the footer.
In Cyberimpact:
- Create an HTML form.
- Configure it, generate the code, and save it somewhere.
In WordPress:
- In the administrative tool, go to Appearance > Widgets.
- Drag a “custom html” block into the widget area where you want your form to appear.
- Paste the form’s code.
Customize your form’s code:
The code we give you is basic, but you can modify it to suit your needs (html, css, javascript). Note that it will not be saved anywhere in your Cyberimpact account.
Before publishing it to its final location, we suggest that you do some testing, by adding your form to a page that is not visible. You can modify the code (add css classes, move divs, etc), ensuring that you don’t modify the “name” attribute of the fields or that you don’t forget about the hidden fields, which would prevent it from working properly.
Always test your form before publishing it to make sure that subscriptions are being saved correctly.
Option 4: Display a subscription form popup
Yes, it’s possible! If your theme or page builder (Divi, Elementor, etc.) already offers a way to create popups, you can probably use it to add code generated for an html or iframe form, or even a link to a hosted form (see option 1). Otherwise, you will need to search the WordPress plugins bank.
Before you start: choosing a plugin
What you need is a tool capable of creating popups and allowing you to add html code to its content.
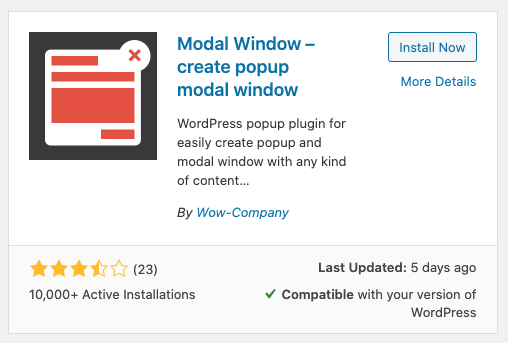
Among the paid extensions, OptinMonster is recommended for its flexibility, comprehensive functionality and user-friendly interface. If you are looking for a free tool, we loved the simplicity of Modal Window. We’ll use it in the example below, along with an iframe form from Cyberimpact.
Step 1 – Create your subscription form
In Cyberimpact:
- Create an iframe form and customize it to your liking.
- Copy the code so you can add it to your site later.
About the dimensions:
In the Cyberimpact editor, you can change the width and height of the iframe to adjust the form preview. You will be able to modify these dimensions when you integrate it on your site.
Step 2 – Install the plugin
In WordPress:
- To install the plugin, in the left bar click Extensions > Add.
- In the search field, enter the words Modal Window.
- Click on Install, then Activate.
- A Wow Plugins menu will be added to the left bar
Step 3 – Create the popup
- Go to the section Wow Plugin > Modal Window.
- Select Add New.
- Give your form a title (this title will not be displayed).
Please note:
- The save button is at the top, next to the title field.
- If you check the Test Mode box, you’ll be able to see if everything works without disturbing your visitors. Only a user logged into the administration tool will be able to see the popup.
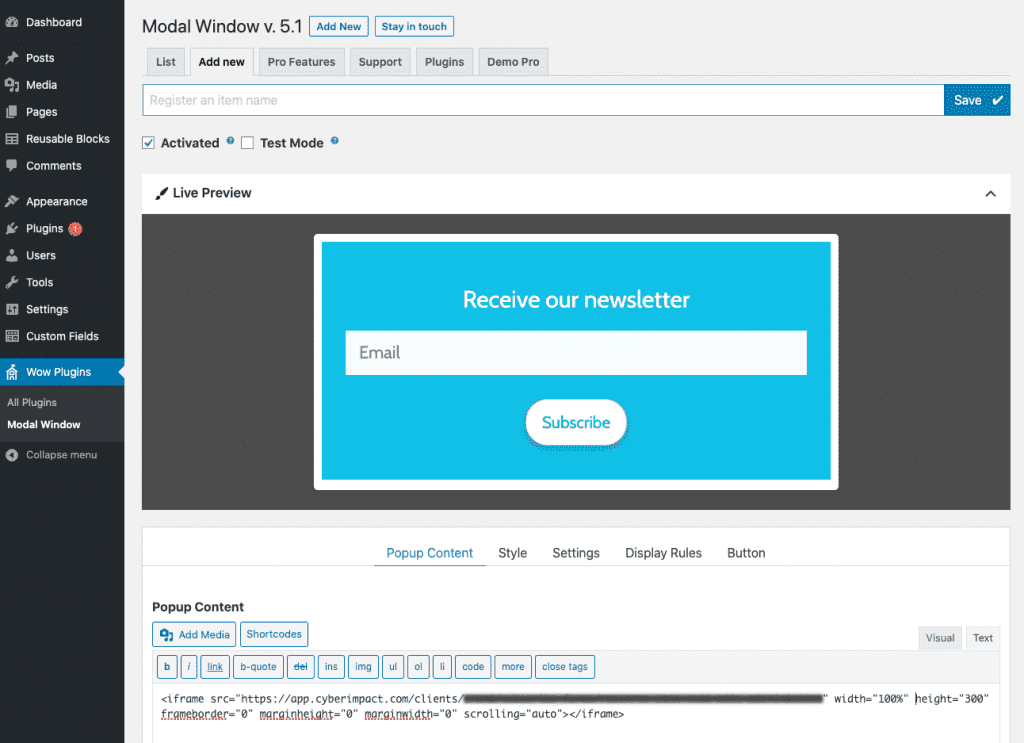
a) Insert the iframe’s code in the popup content
Under the title you will find the visual preview. Then, a little below, the content and configuration section. In the Popup Content area, activate the Text tab and paste the code of your iframe. You should see the preview adjust.
PS: remember to set the width to 100% in your iframe’s code.
b) Adjust the styles
The Style tab allows you to adjust positioning, colours, and several other visual options. Since I’m using an iframe form, the design already looks good, and there is no need to modify it. But, for the sake of our example, I chose the same background colour I used for my form and replaced the Close button with an icon.
c) Configure the settings
In the Settings tab, you can adjust how the popup will act. If you want your visitors to only see the popup on their first visit, this is where you will find the necessary options.
The Display rules tab allows you to specify the circumstances in which the popup will be displayed (for example: do not display on mobile or display only on certain pages).
Most of these settings are optional and are completely discretionary. As soon as you’ve added the content and saved it (without being in test mode), your popup should work. The rest is just perfecting 🙂
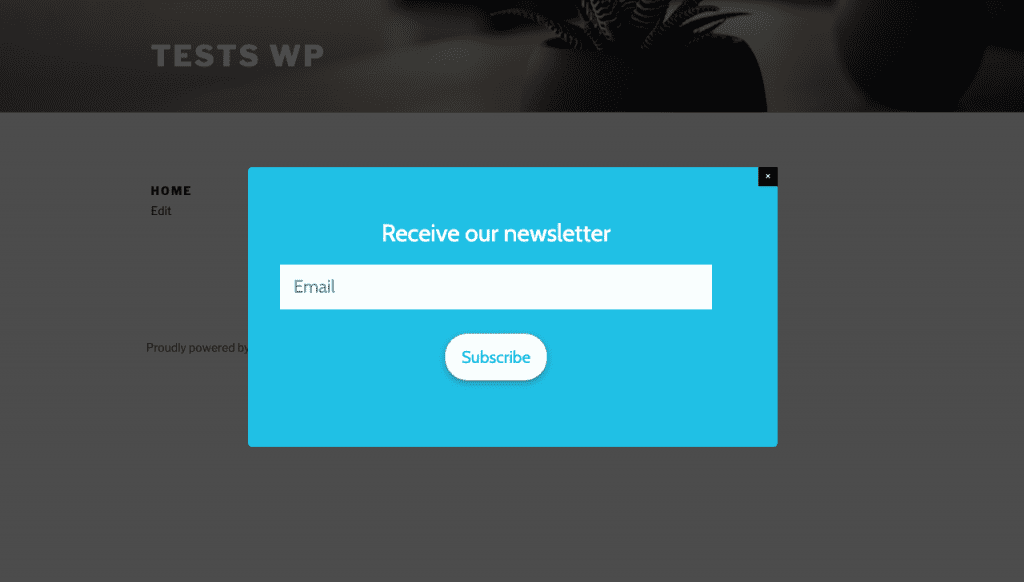
The final product:
What to do if the popup doesn’t show
Depending on how your site was built, some plugins might not work. In this case, don’t panic: close it, uninstall it, and try another one. If you’re having a lot of trouble finding one that works, you may need to hire a developer or choose another method to embed your form.
You’re good to go! Don’t forget to welcome your new subscribers
A subscription form is a great first step to growing your contact list, but it’s also a great opportunity to pique their interest. This is the perfect time to send them a welcome email! Include special content: suggest a blog post to read, send a discount code, an ebook, or just a short message from you.
Check out our frequently asked questions on how to automate your welcome emails.